Introduction
SpectrumAnalyzer is a state-of-the-art spectrum analyzer plugin, which offers a lot of opportunities to display the spectral content of your audio material and helps you create a better mix this way. SpectrumAnalyzer comes in two editions, a free and a full version. SpectrumAnalyzer offers a mode based on bandpass filters, and not only FFT like many others. This allows a much better oversight of the frequency balance of a mix. SpectrumAnalyzer contains a digital FFT (Fast-Fourier-Transform) and an analog-style (parallel band-pass IIR filter) engine.
It is possible to use the analog-style-analyzer and the FFT-analyzer at the same time,
so you can benefit from the better time resolution of the band-pass filters and the better frequency resolution of the FFT. Also it's possible to show the spectral content of the mid/side signal in a separate analyzer slot. The internal auxiliary functionality makes it possible to send audio from one instance to other instances. This is a quite powerful tool, because you can set up as much aux-sends as you want, and then it's possible to easily switch between them as input source.
Installation
Mac
Open the dmg-File you have downloaded and double-click on the containing pkg-File. Select "continue" on the welcome screen. If you see the "Select the Destination" screen, you can click "continue" as well. Then, select "Install" and enter your admin password. The actual setup software will start afterwards.
Please click on the "I agree" button if you agree to the "License and Legal Information".
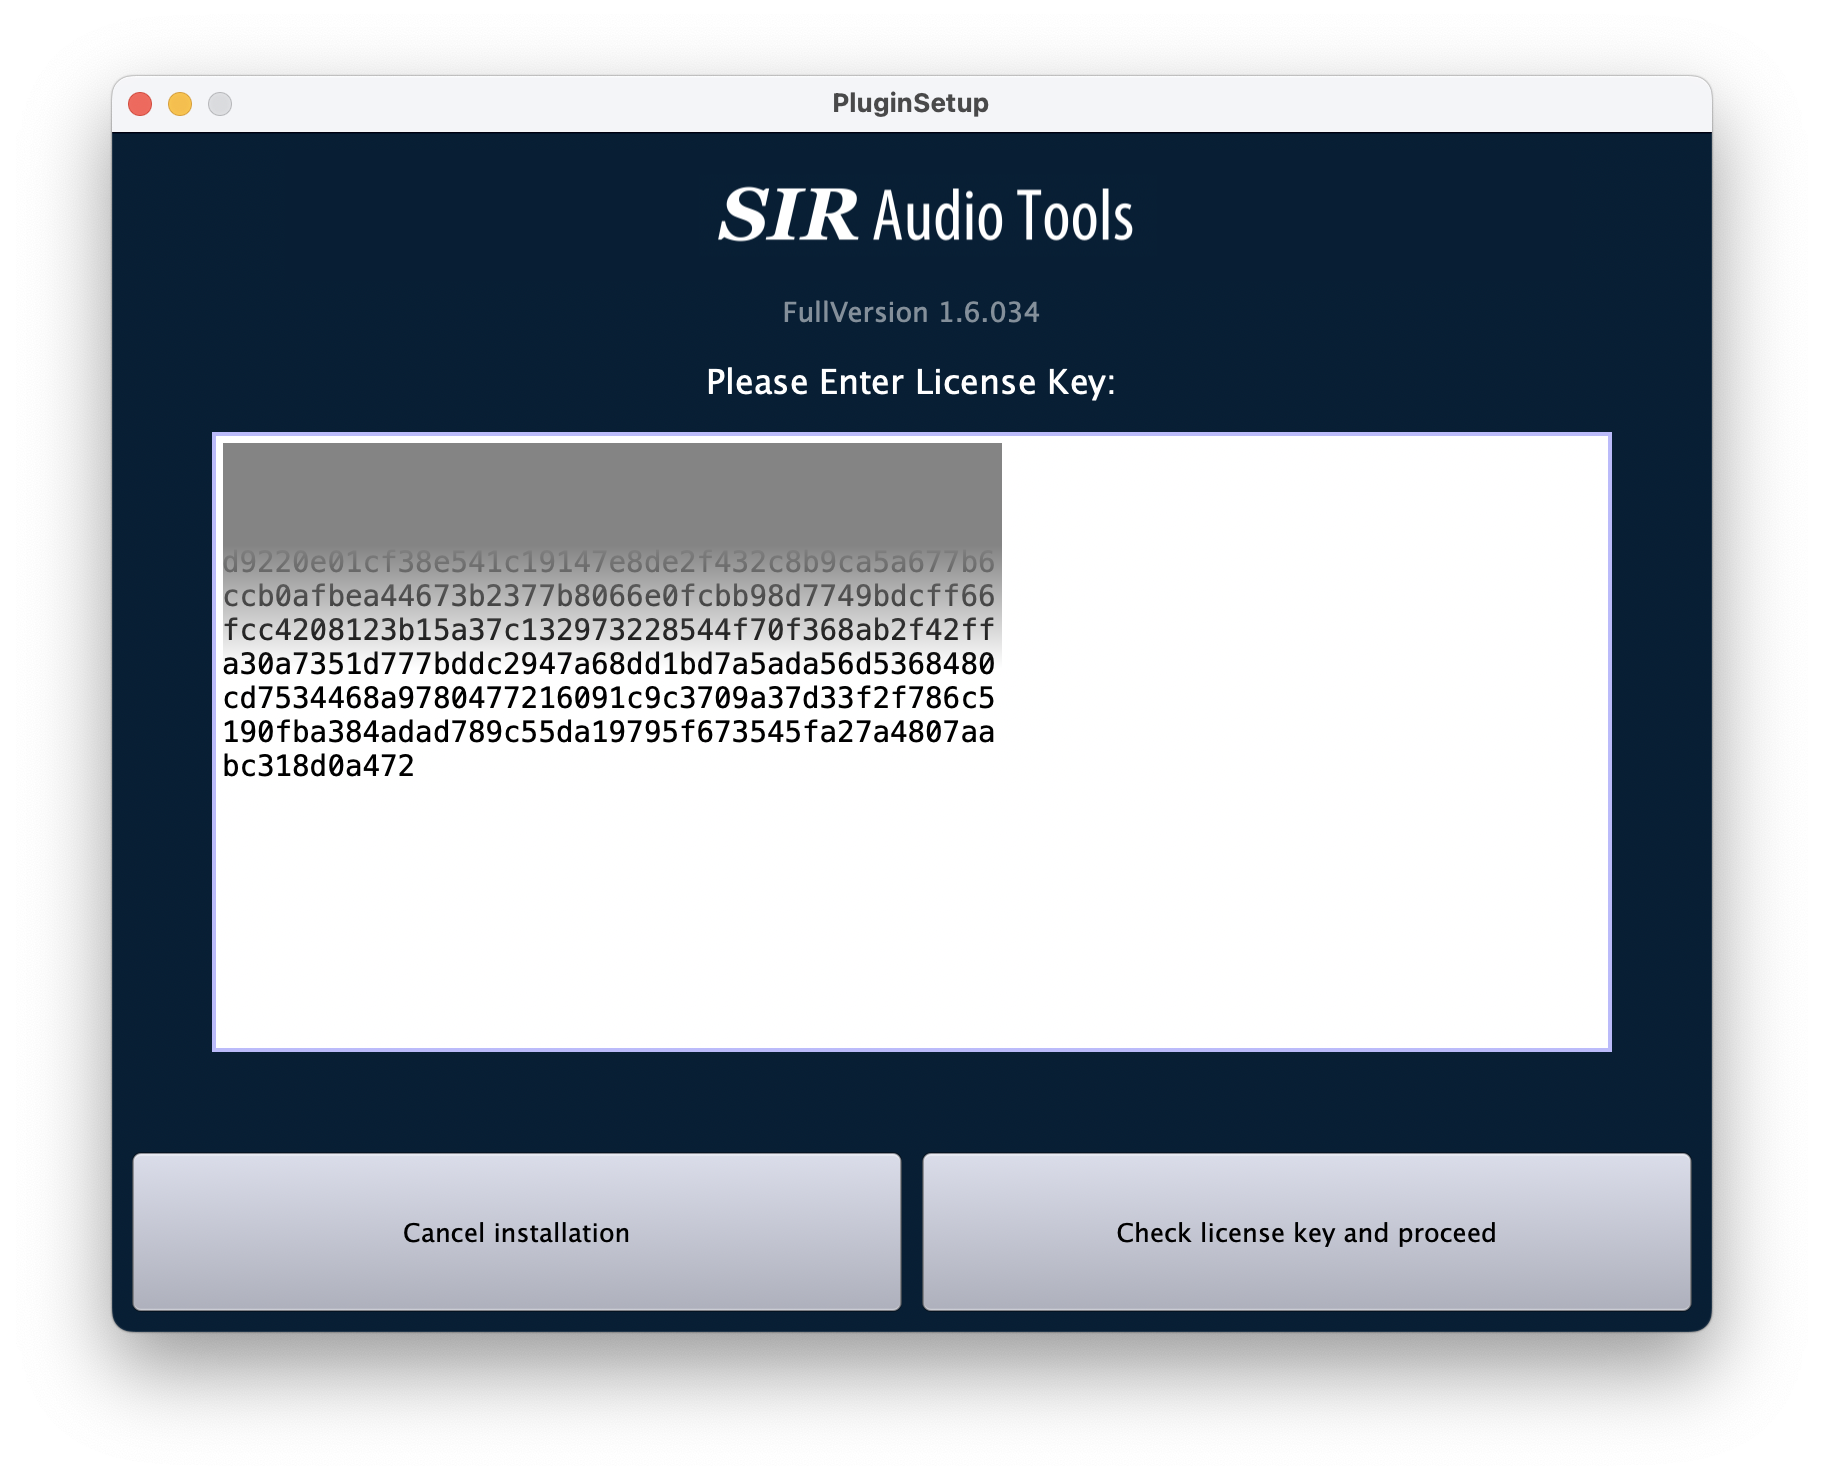
If this is a first-time installation, the license key will be requested at this point. First, copy the license key from the mail you received after purchasing the software. If you can't find your license key, please make use of our License-Key Recovery Tool.
Select the license key and press the key combination "Command" + C, so that you can copy it. To paste the license key into the input field of the installer, press the key combination "Command" + V.
If the license-key isn't accepted:
- Please check again that you are using the correct product installer and not accidentally using an installer for another product. Also check that you are not accidentally using a license key for another product. If you are no longer sure, you can also request your license keys using our License-Key Recovery Tool.
-
Sometimes it also happens that a license key is changed by an automatic translation service and is therefore invalid. This often affects Spanish or French-speaking users. Please make sure that such a translation function is deactivated.
-
If this doesn't solve the problem, please take a screenshot of the installer after you have inserted the license key and send it to us. We will analyse the problem promptly and send you a feedback.
The correct plugin paths for VST, VST3 and AAX plugin formats are pre-configured automatically. If you want, you can change them manually, but that is not recommended. Press "Install Now!" and confirm the installation settings.
Windows
Open the zip-File and double-click on the containing setup executable-file.
The unpacking process may take a while. Once it's over, you'll see a Windows notification asking "Do you want to allow this app to make changes to your device?" Please select YES.
Please click on the "I agree" button if you agree to the "License and Legal Information".
If this is a first-time installation, the license key will be requested at this point. First, copy the license key from the mail you received after purchasing the software. If you can't find your license key, please make use of our License-Key Recovery Tool.
Select the license key and press the key combination "Control" + C, so that you can copy it. To paste the license key into the input field of the installer, press the key combination "Control" + V.
If the license-key isn't accepted:
- Please check again that you are using the correct product installer and not accidentally using an installer for another product. Also check that you are not accidentally using a license key for another product. If you are no longer sure, you can also request your license keys using our License-Key Recovery Tool.
-
Sometimes it also happens that a license key is changed by an automatic translation service and is therefore invalid. This often affects Spanish or French-speaking users. Please make sure that such a translation function is deactivated.
-
If this doesn't solve the problem, please take a screenshot of the installer after you have inserted the license key and send it to us. We will analyse the problem promptly and send you a feedback.
Choose the correct plugin paths for VST, VST3 and AAX plugin formats.
If you are not sure where the plugin directory of your DAW software is located, please look into the manual, or use the settings dialog of your DAW.
Please make sure that the host is using the same architecture (32bit/64bit) as the plugin.
De-installation
General
Mac
Download the installation package and double-click on the containing PKG File, then click on:
"Continue" -> "Install"
The custom de-installation process starts afterwards.
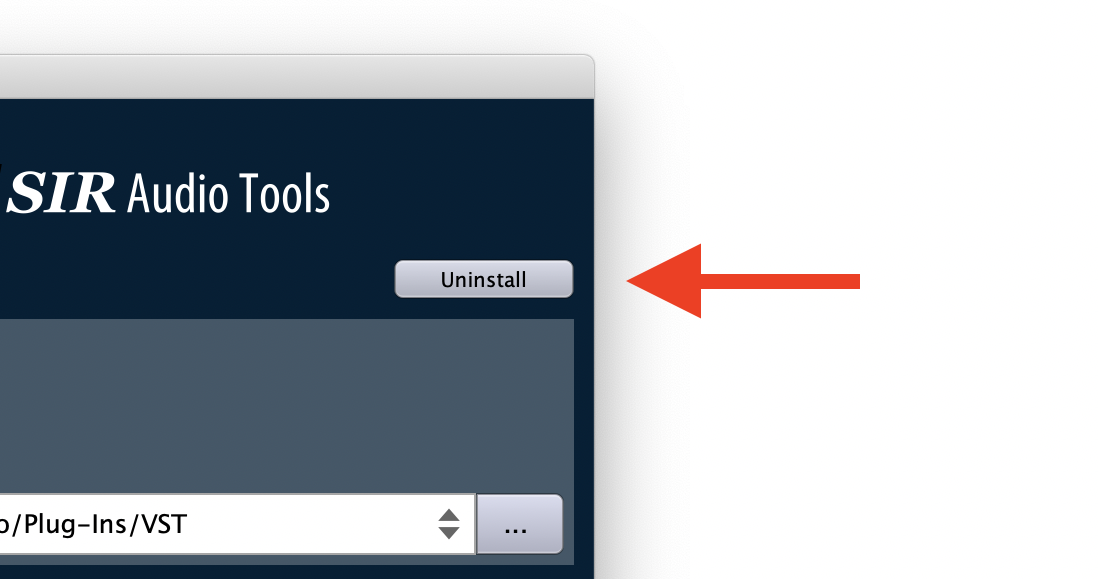
Accept the license agreement and click on the "Uninstall"-button at the top right corner. To finalize the process, click the "Uninstall Now!" button.
Windows
Open the setup-application, accept the license agreement and select "Uninstall" on the top right. To finalize the process, click the "Uninstall Now!" button.
Additional Files
The setup uninstall routine will remove all major files (plugin binaries and content library) from your computer. However, a few very small files, which store configuration properties like the license key, will reside on the machine. If you want to get rid of these files, you can find them in these directories:
Mac
/Users/username/Music/Audio Music Apps/SIR Audio Tools
Windows
%APPDATA%\SIR Audio Tools
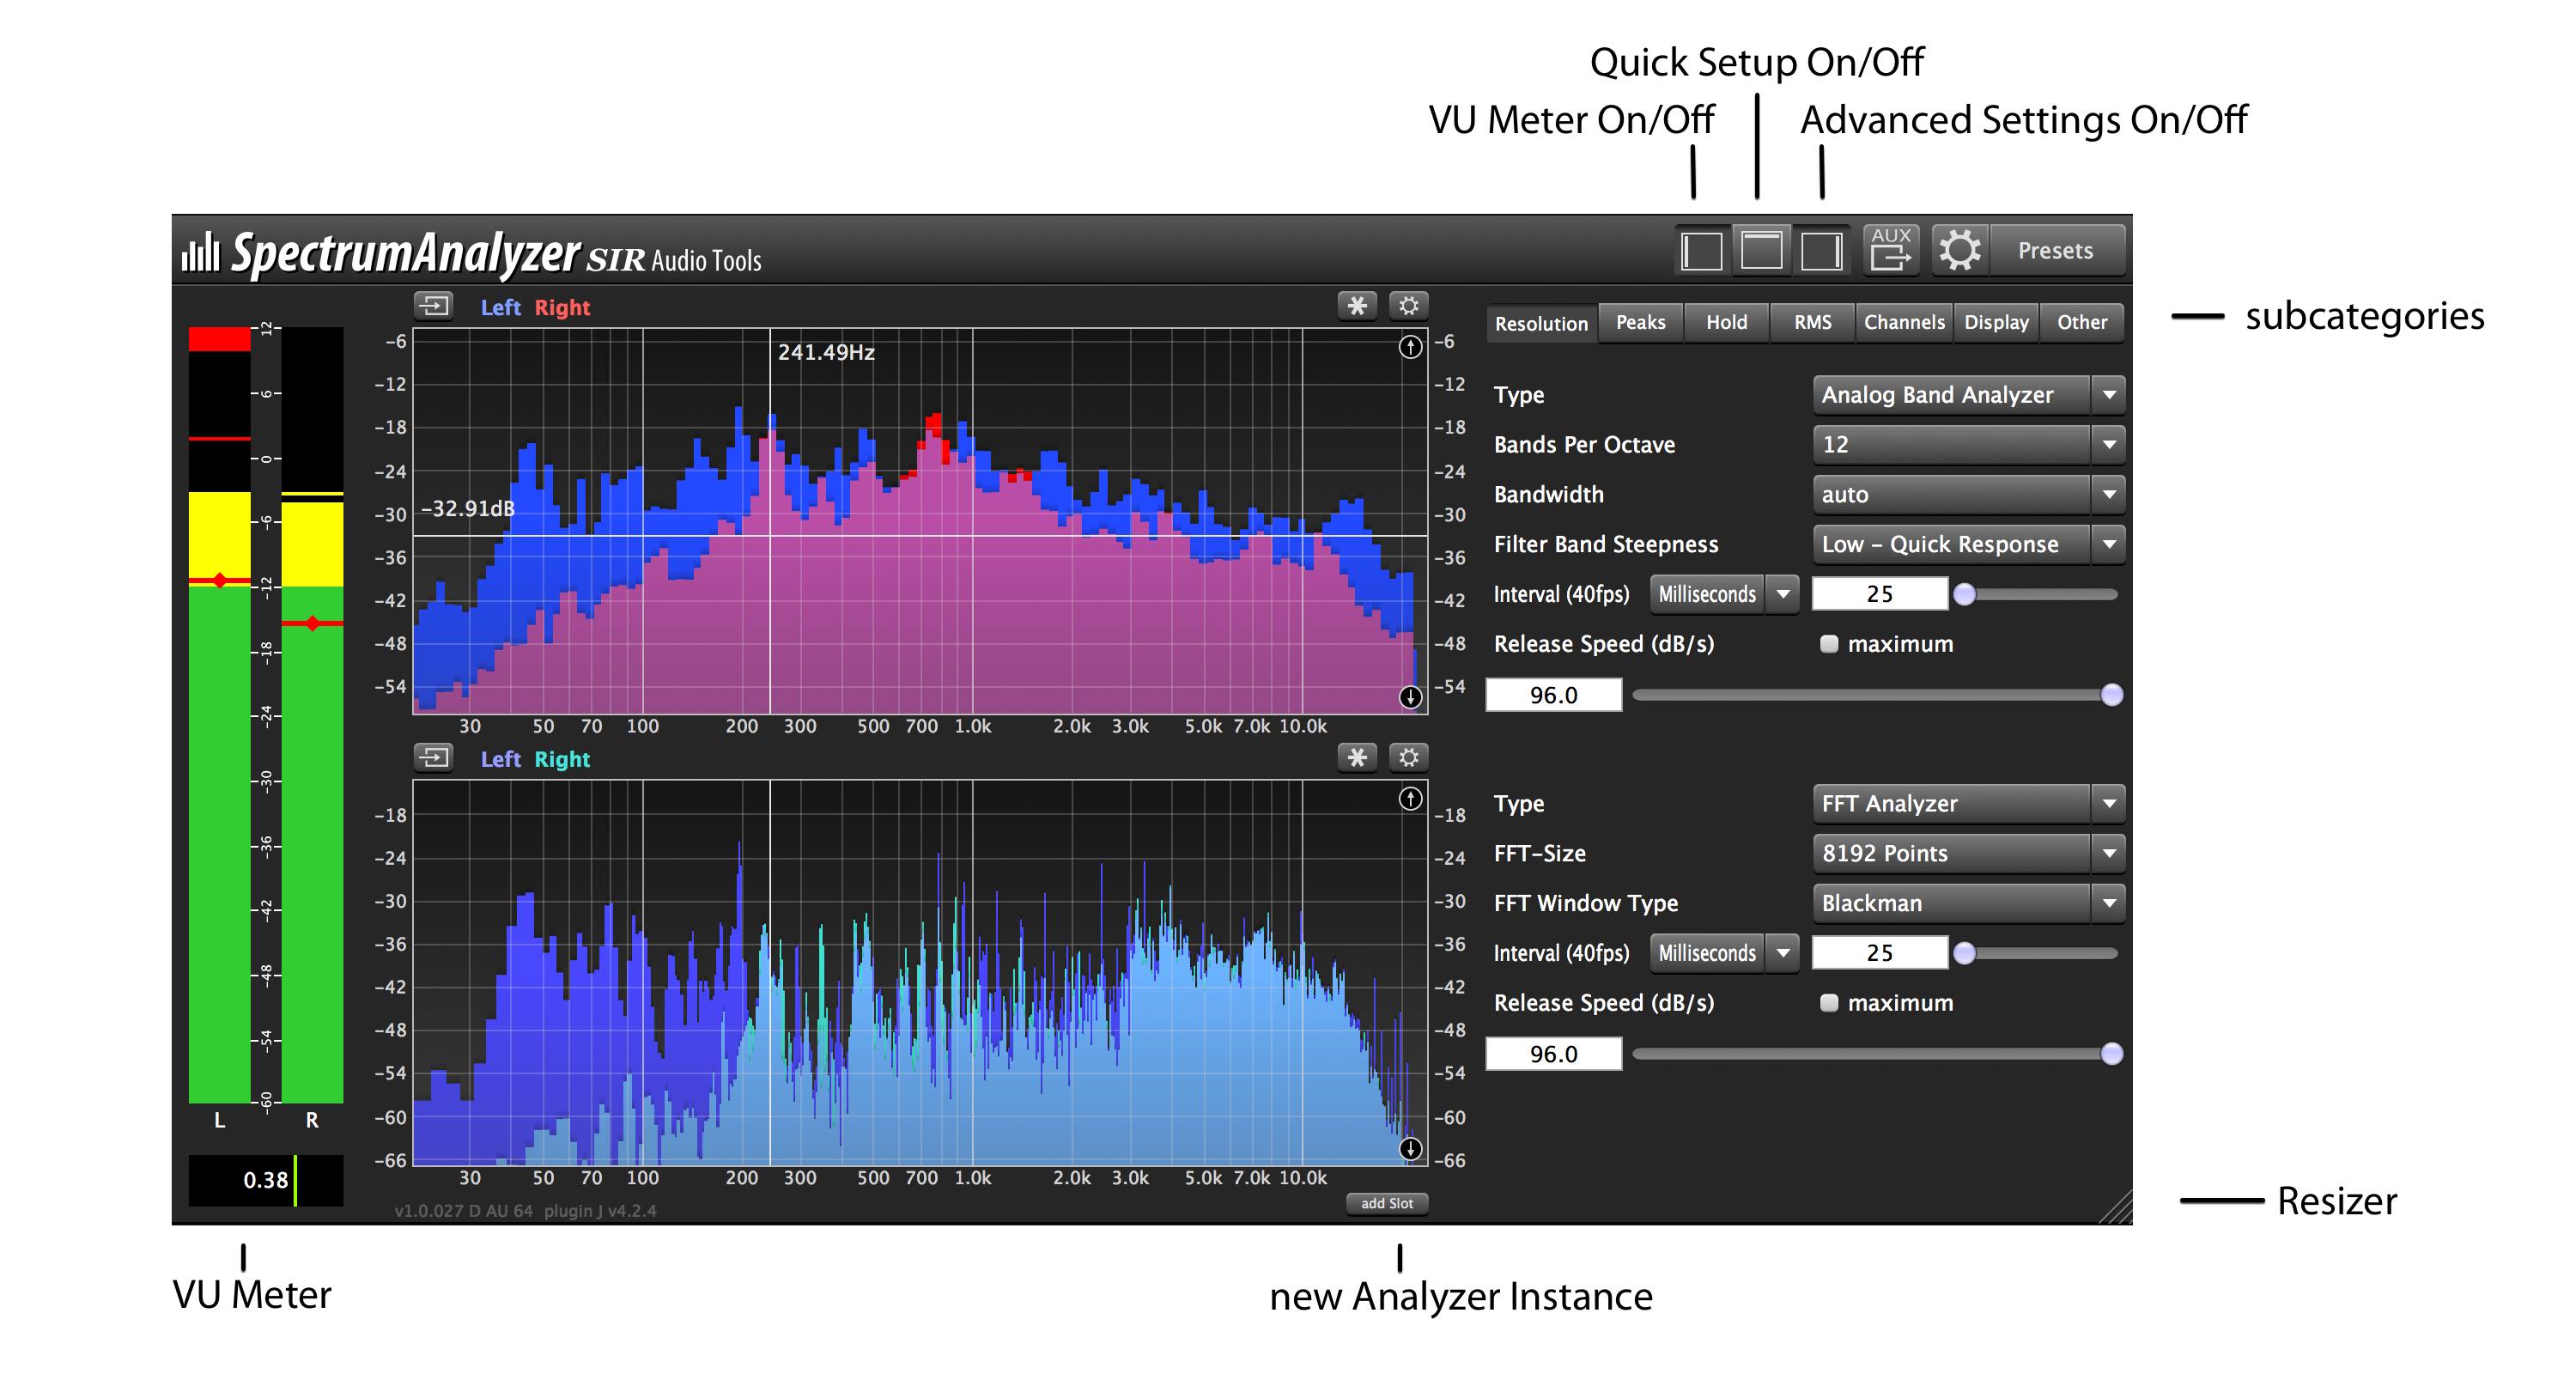
GUI Overview
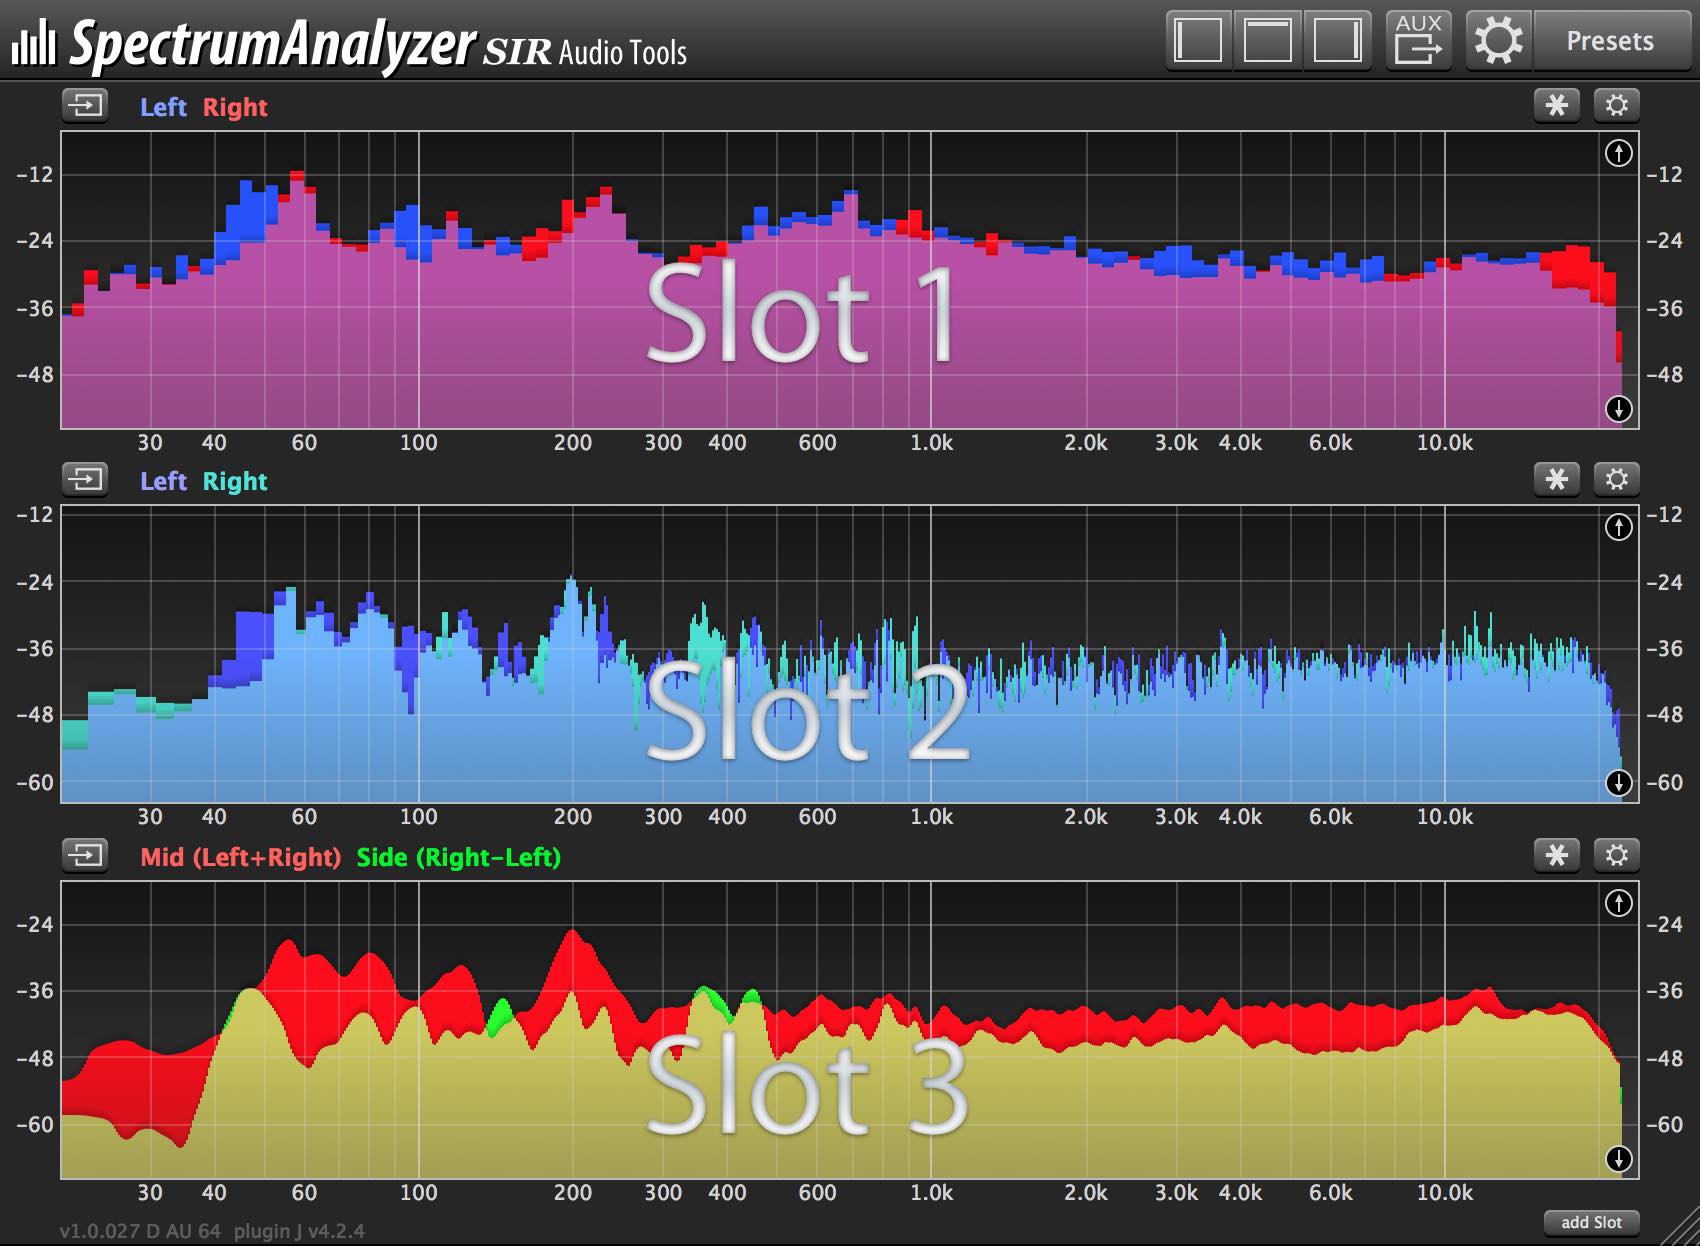
Slots
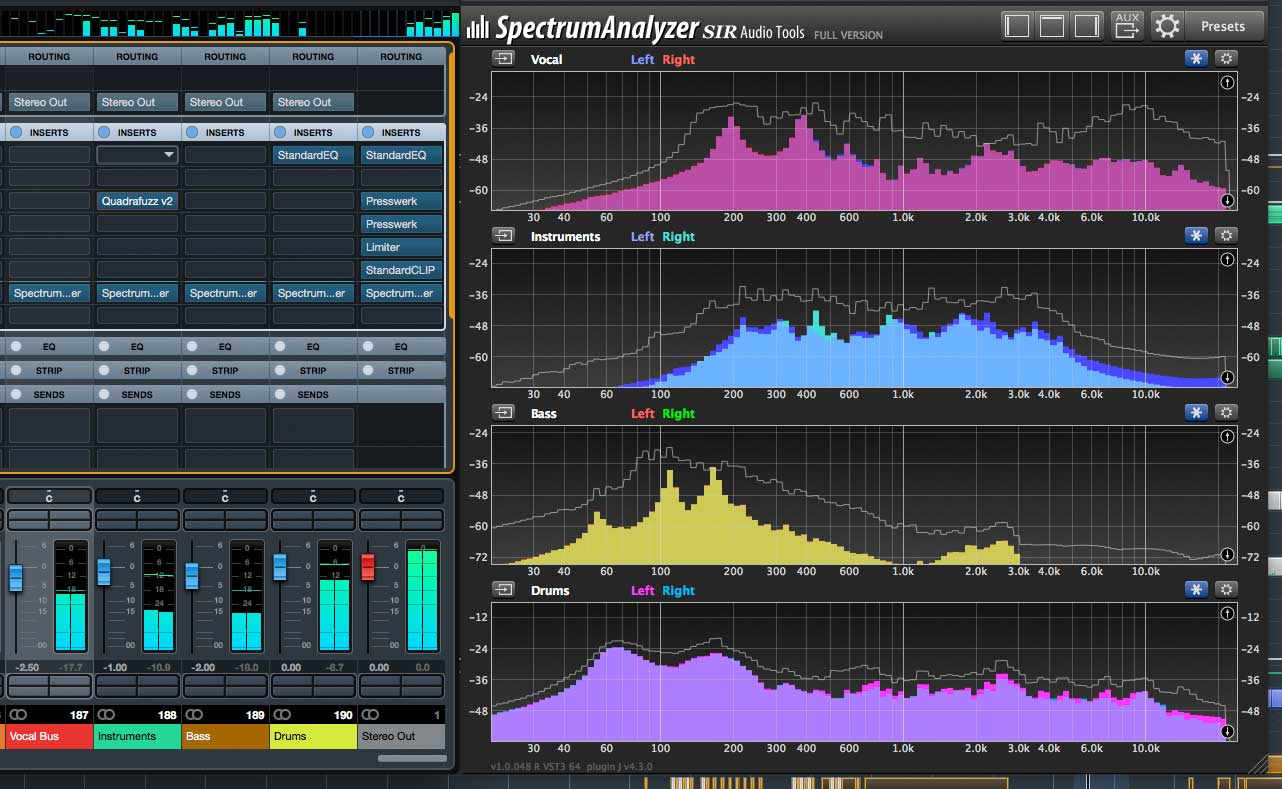
SpectrumAnalyzer can manage multiple analyzer displays (slots) in one plug-in instance.
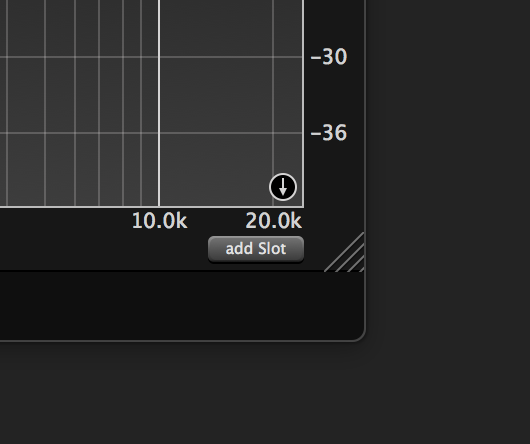
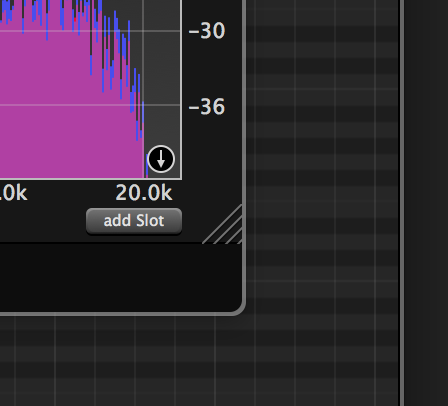
It's possible to choose between different channel-set combinations from the "Quick Setup" menu (Mono - Stereo - Stereo Mid/Side, see below). Add additional slots via the "add Slot" button at the bottom of the plugin GUI.
If you want to remove a slot, or reorder, click on the options button at the top right of the plugin GUI.
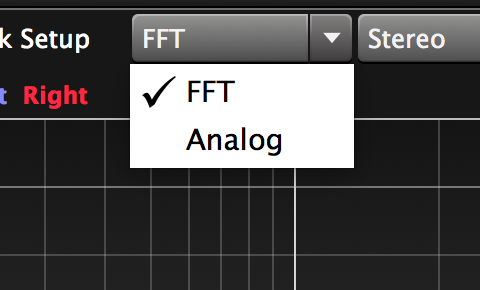
Quick Setup
To enable the quick setup menu, you have to click on the top-bar-menu

button.
Via the quick-setup menu you can quickly change the fundamental settings of the analyzer.
Type
Press the drop-down menu button to select between analog-style (parallel bandpass filter) or FFT engine, for all visible analyzer slots simultaneously.
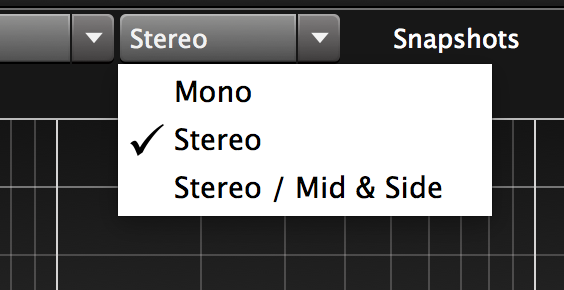
Channel Sets
With this button, you can switch between some pre-configured channel-configurations.
If you want to use other configurations, simply set up them in the "channels" settings in the analyzer details (see below) menu.
Mono
This opens a slot with one mono channel. You will see the spectral content the first channel of your track.
Stereo
A slot with two channels in one slot (overlay).
Stereo Mid/Side
Two slots, first with two channels (overlay), the second with the mid and side signal (overlay)
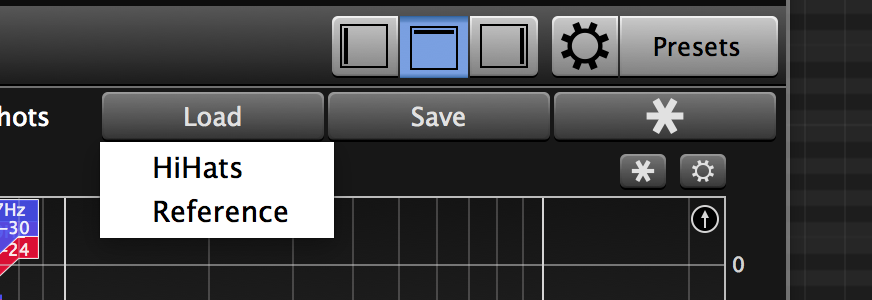
Snapshots
To enable the snapshots menu, you have to click on the top-bar menu
button.
The snapshot "save" button freezes the current spectral-state for saving. Enter the name of your snapshot, so that it can be easily reopened later. Recall the snapshot with the "load" button.
Because
SpectrumAnalyzer has the possibility to be configured with a lot of different options, the snapshot also includes the current settings (engine, resolution etc.)
So if you recall a snapshot, it will also load the settings, which were present at the time you saved the snapshot.
Technically spoken, a snapshot is a combination of the current spectral state and a preset.
You can delete a snapshot via the presets menu.
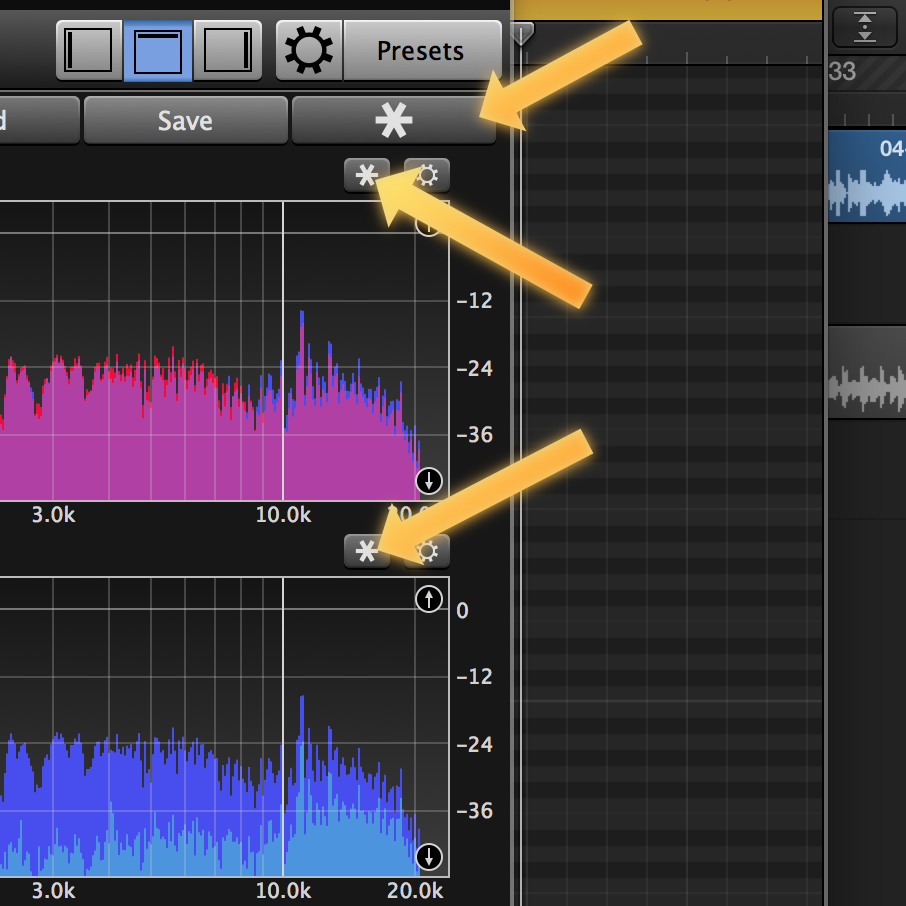
Freeze
Independent from the snapshot function, you can always freeze a single or all slots via the freeze button.
Auxiliary
This feature makes it possible to send audio between all SpectrumAnalyzer instances.
Just insert a SpectrumAnalyzer instance in every track you want to observe, and activate the aux-send button, choose a name which describes the position of the plugin instance.
Then, in another instance you can add slots from this source, or switch between the sources via the AUX Receiver "->" button.
For example, you have different subgroups and want to see the content in one SpectrumAnalyzer instance, put a single SpectrumAnalyzer instance on every track and activate the aux-send of every instance.
Then, in your "main" SpectrumAnalyzer use the "add Slot" button to add slots, which should use the aux-send from other tracks as a source.
The auxiliary-feature is only available if the DAW uses the same process and memory space for all instances of SpectrumAnalyzer, and it only shows the audio-signal which is currently processed by the plugin. That means, if you use internal DAW features like freezing, the auxiliaries will not process. The auxiliary feature has been tested successfully with all major DAWs.
Analyzer Detail Settings
To enable the detail settings menu, you have to click on the right-bar

button.
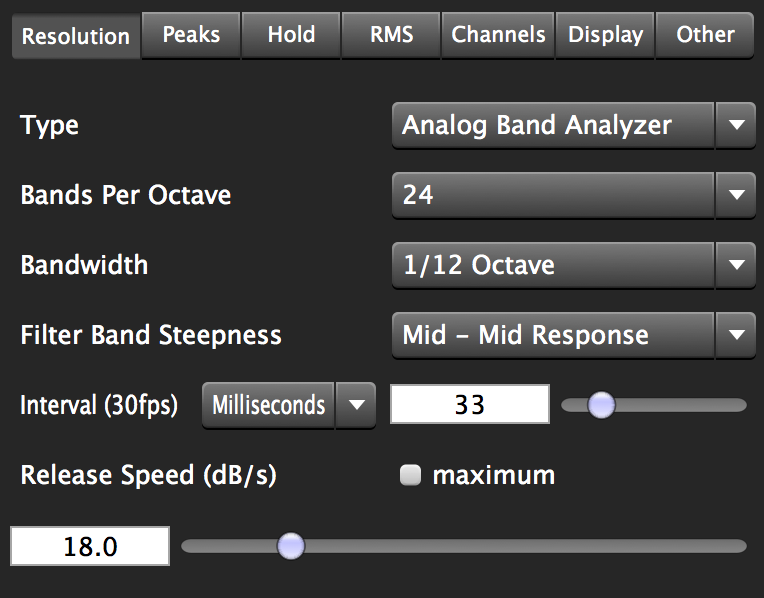
Resolution
There are two different kinds of analyzer engines you can use: FFT-Analyzer & Analog Band Analyzer.
FFT Analyzer
This kind of analyzer works with the "Fast-Fourier-transform" algorithm, which enables an accurate measuring of many frequency bands with relative low CPU-overhead.
FFT-Size
Choose the number of magnitude points, which represent the current analyzed signal, increasing this number will improve the frequency resolution, but it also increases also the visual delay.
Window
Change between different FFT windowing options (Blackman, Hann etc...)
Analog Band Analyzer
The analog band analyzer splits every octave in equal size frequency pieces (unlike FFT, which has bigger low frequency bands and more precision at higher frequencies.
The signal is divided through IIR-Butterworth band-filters.
Bands Per Octave
Select the number of bands, into which every octave is divided. The higher the number, the more CPU-power will be used.
Filter Band Steepness
The higher the filter band steepness, the more precise the separation of filter bands is, but also the lower the timely precision is. So if you want to make sure to detect short transients too, don't use very steep filters.
Time Resolution
This parameter changes how often the signal gets analyzed. The smaller the number is, the more the display will be refreshed. You can also change this parameter by choosing a fractional number of the actual window-size (FFT-Size), which will be used for analyzing the signal (FFT-only).
Release Speed
The release speed of the visualized frequency response. The higher the number is, the faster the visualized frequency response will move downwards.
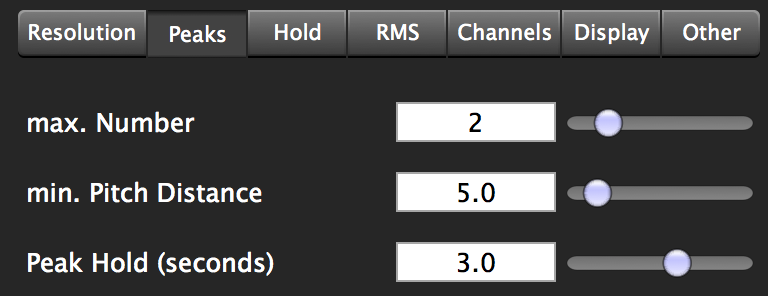
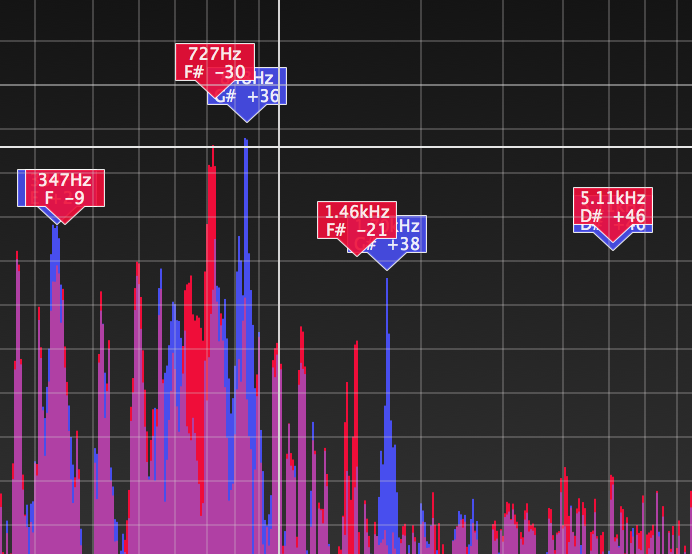
Peak Detection
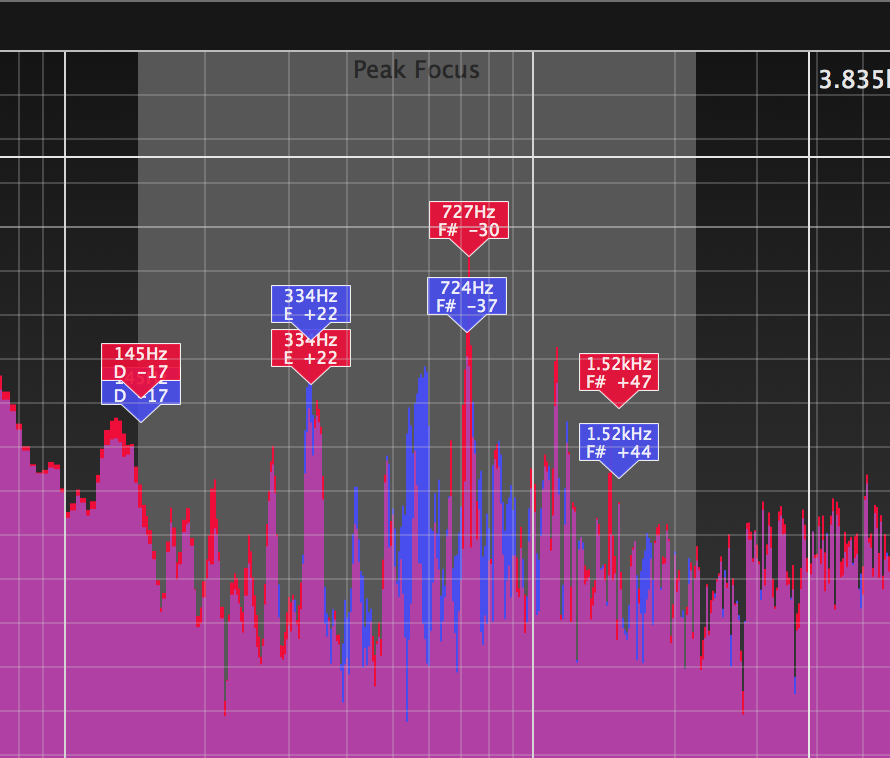
The Analyzer has an intelligent peak-detection, which automatically detects the frequency peaks in the signal. These settings allow you to change the maximum number of peaks which should be detected, and how small the minimum distance of those detected peaks should be.
Peak Focus
Drag within the frequency display, to focus the peak detection on a specific frequency range.
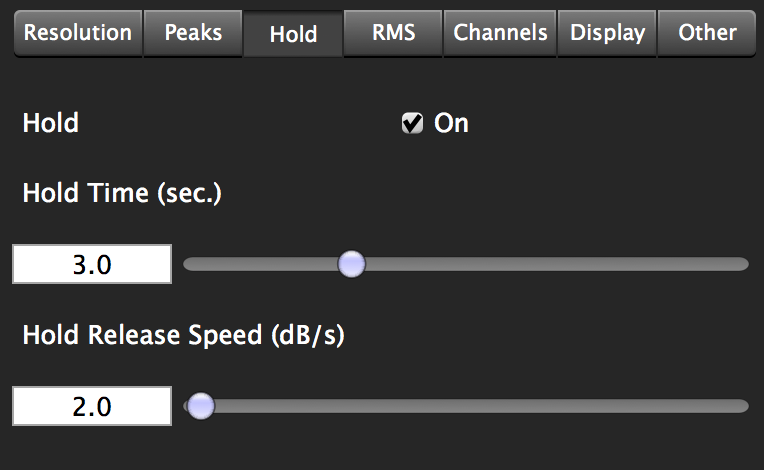
Hold
The hold detector memorizes the highest frequency magnitudes at all positions. Change how long the maximum values will stay (Hold Time) and how fast they will move downwards (Hold Release).
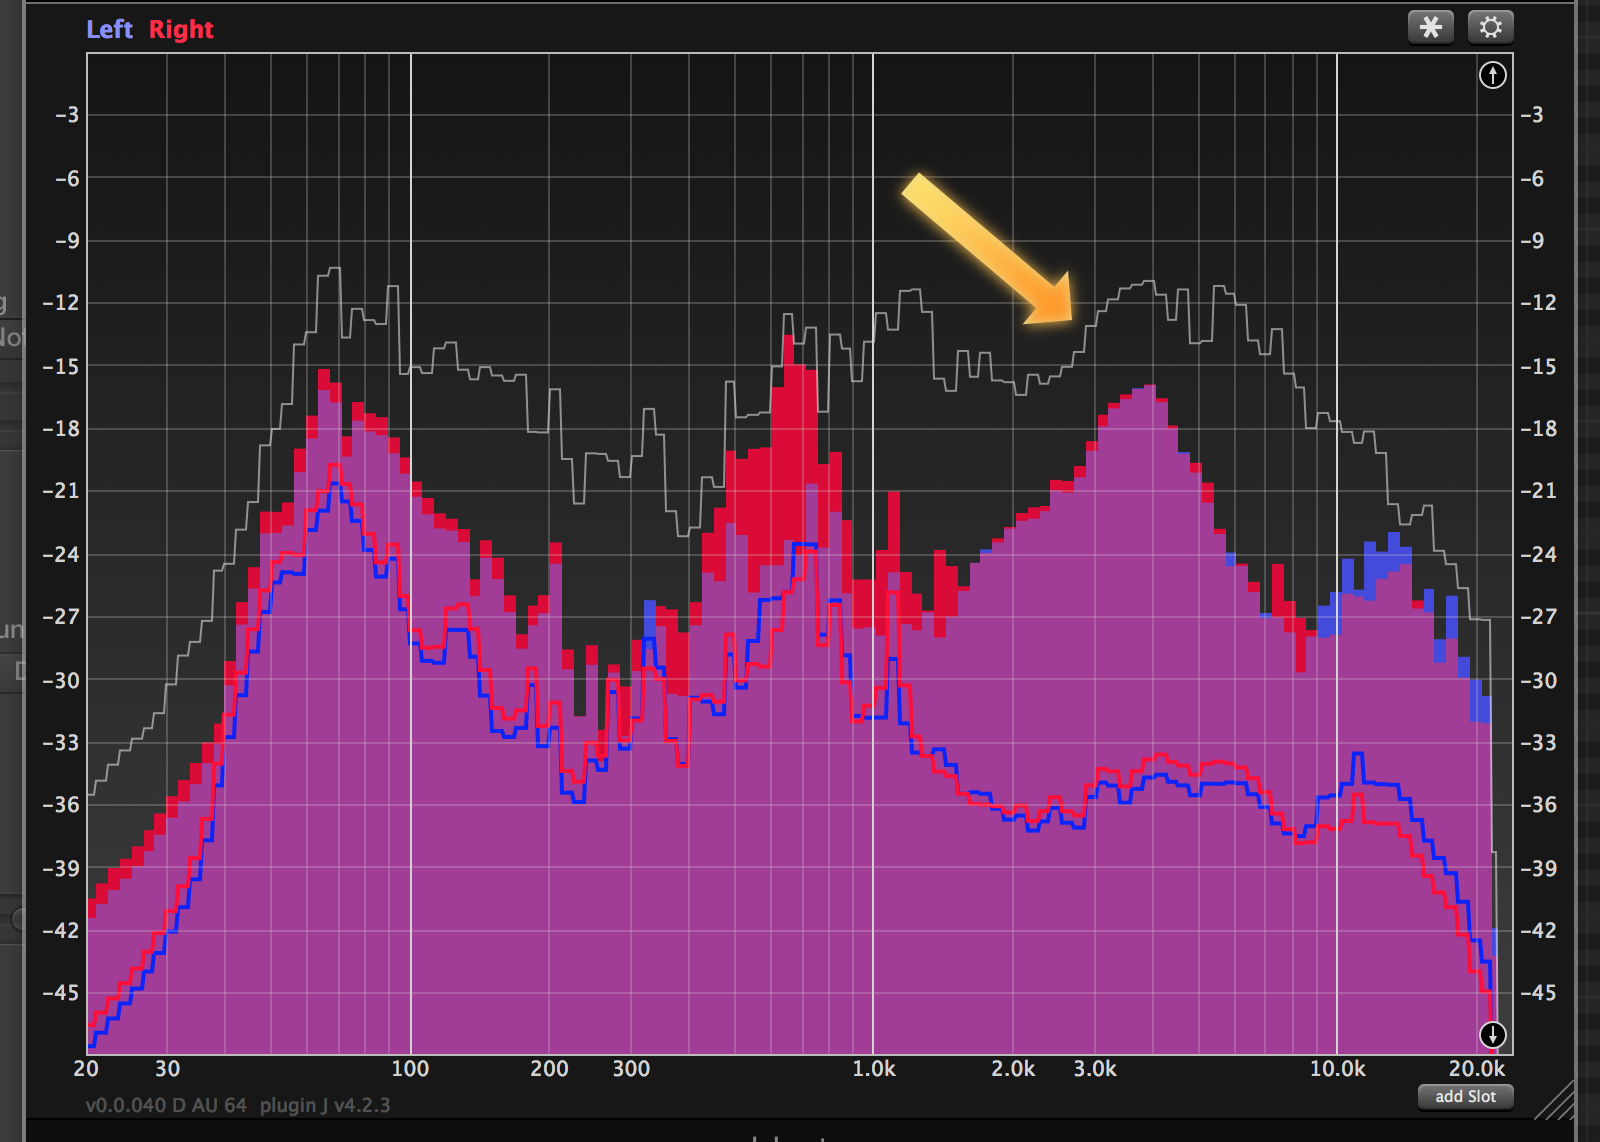
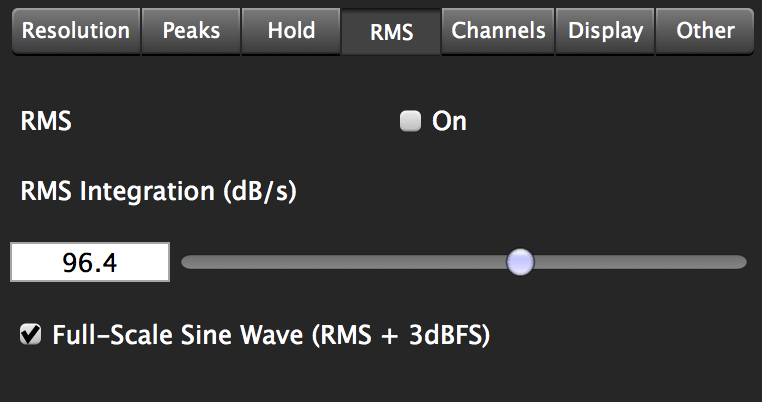
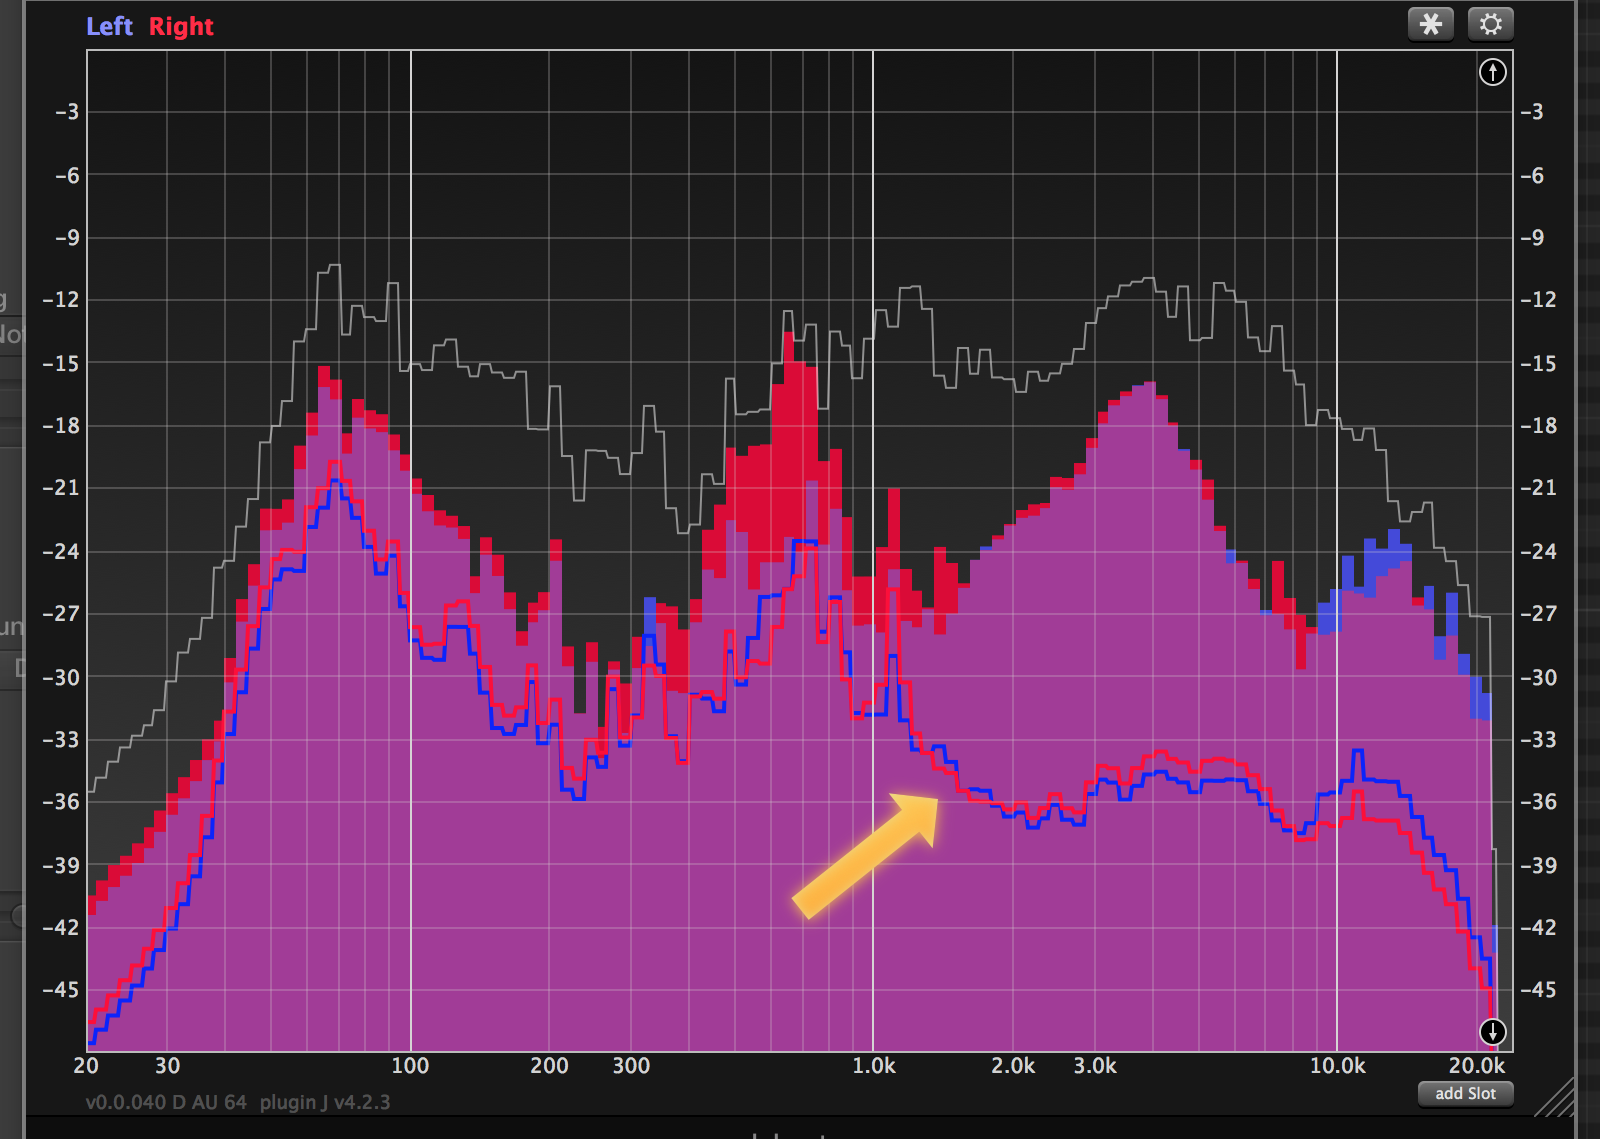
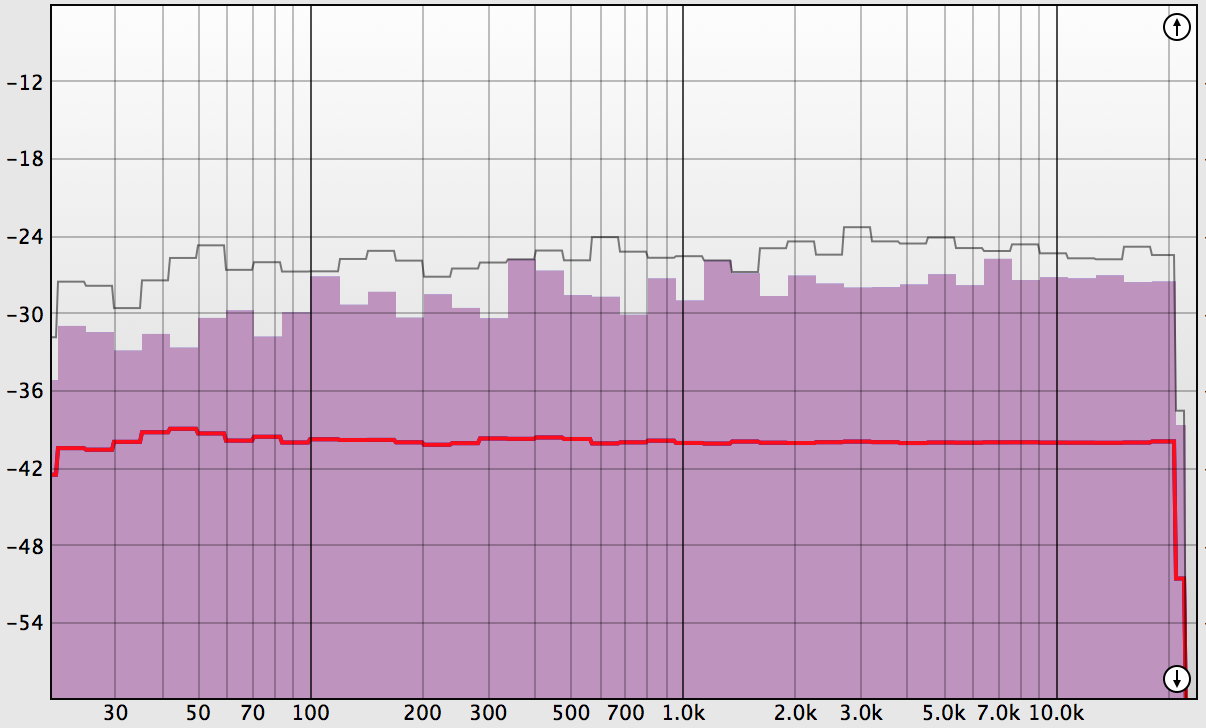
RMS (only for Analog Band Analyzer)
With this option, it is possible to see the RMS-value for every single band. This feature is suitable to analyze the overall balance of your frequency spectrum in a temporal context.
If you choose the RMS-value to be sinus weighted, it will match the peak-value when the signal contains a continuous sinus-tone. Otherwise it will 3 dB lower.
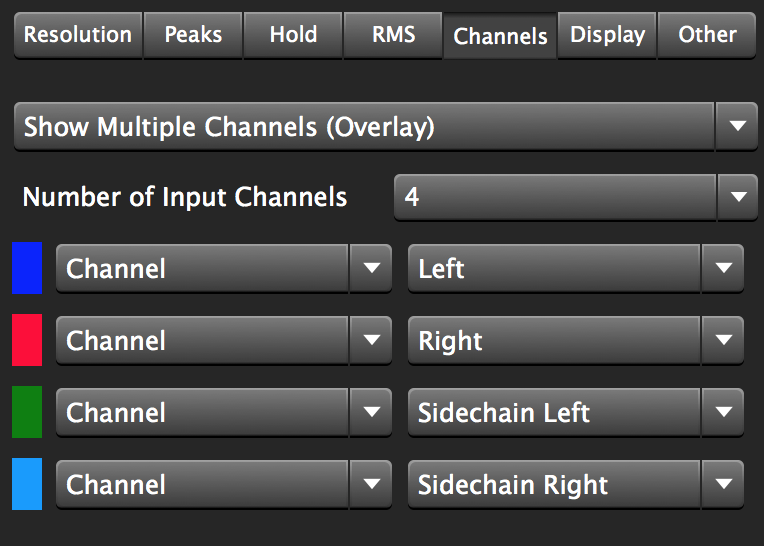
Channels
Show Multiple/Maximum
Select if all channels (from the list below) should be shown, which will overlay all spectrum-graphs, or if only the maximum of all channels will be visible.
Number of Input Channels
Select the number of channels, which should be analyzed. Increasing this number will also affect CPU-consumption.
Channel Setup
Every analyzer-channel can have a different color. Click on the colored-box at the left side to change the color.
Per analyzer-channel you can either analyze a single audio audio-channel, the mid-signal (e.g. Left+Right) or the side-signal (e.g. Left-Right).
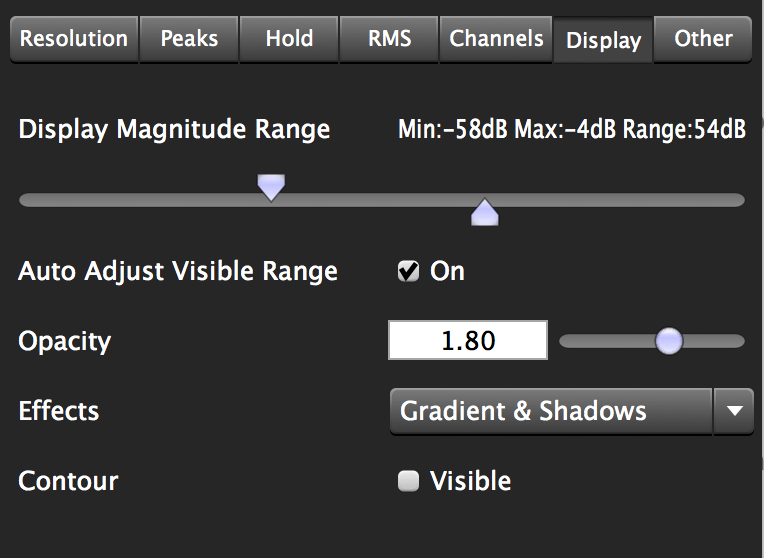
Display
Change the magnitude-range, the opacity of the frequency bands in the display. You can also add an optional contour line for better visualization.
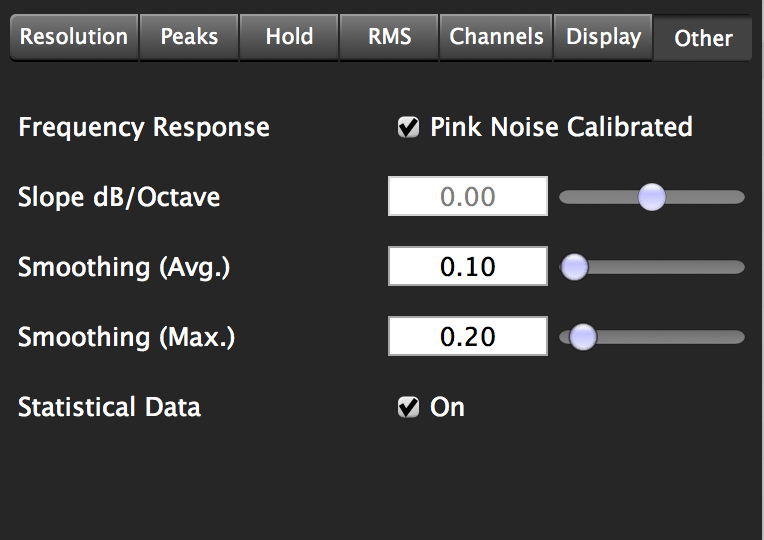
Other
Frequency Response - Pink Noise as Flat Response
When using pink noise as input-signal, the analyzer outputs a sloped frequency-response. This setting will compensate this behavior and will show the response as a rather flat line. This is useful for the most musical applications.
The response will not exact flat, because the output of the FFT and the analog style bandpass analyzer are peak-values, and the compensation is related to the effective value (RMS). If you turn on RMS detection (analog style analyzer only), you see the pink-noise as a flat-line.
Smoothing
Smooth the frequency response graph to get an average frequency magnitude on a certain position. There are two different algorithms available, smoothing average and smoothing maximum, which are combinable.
Options Menu
Reset Parameter
This button resets the analyzer to its initial state, which doesn't includes any analyzer slots.
Meter Settings
Change the range and RMS settings for the VU-Meter.
Zoom
Adjust the whole plugin-GUI size.
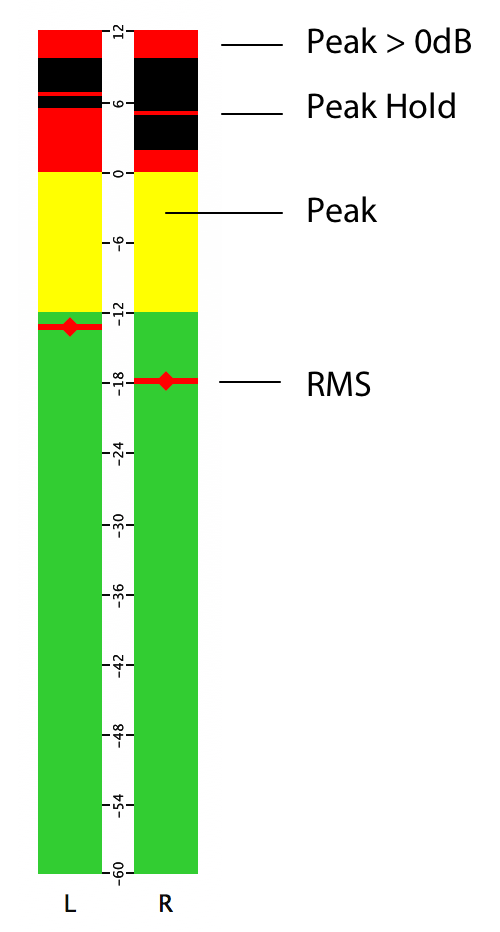
VU-Meter & Stereo Correlation
To enable the VU-meter, you have to click on the left-bar menu

button.
This is a peak-meter, a peak-hold meter and an RMS-meter.
A big red block on the top shows that the output is going above 0 dBFS.
Change the range of the scale and other settings via the options menu or via right mouse click.
The stereo correlation meter shows how similar the left and right channels are. The value "1" means that both signals are completely equal (mono), the value "-1" means that both signals are completely different.
Presets
To open the presets menu, click on this button.
To activate a certain preset, just select it.
If you want to delete a certain preset, click on the setting button, right next to the preset-name, and then on "delete".
If you want to organize the presets and create/delete folders, click on the "..." button.
This will open the location of the presets in the Explorer(Win) or Finder(Mac), and then you can freely manage your presets by just moving the files around as you like.
Factory Presets
A selection of presets, designed to start quickly. The FFT-presets are better for detecting exact frequency peaks, the analog-style analyzer presets are better for detecting the spectral profile of transients and the overall spectral balance.
Analog 1/4 Octave
A band-pass based analyzer, which consists of 4 band-pass filters per octave with mid steepness.
Analog 1/4 Octave Quick Response
Analog-style analyzer, which consists of 4 band-pass filters per octave with low steepness, and a fast release speed. These parallel filters allow you to measure transient signals very precisely and quickly.
Analog 1/4 Octave RMS Smooth
This is an analog-style analyzer, which uses the smoothing algorithm to soften the spectral profile.
The RMS-graph (bold colored line) shows the spectral energy in a time context. If you have a short time-event, it will have less impact on the RMS-graph. If you have a continuous signal at a dedicated frequency position, it will be higher.
Analog 1/4 Octave Stereo + Mid/Side
This is combination of two bandpass analyzers. The first one detects the spectral information of the left and right channel (overlay), the second one shows the Mid (Mono) and the Side (Stereo)-Content of the audio-signal. This is helpful to detect low-frequency phase-issues.
Analog 1/12 Octave (full version only)
A band-pass based analyzer, which consists of 12 band-pass filters per octave with mid steepness.
Analog 1/12 Octave Max RMS (fast) Smooth (full version only)
This an analog-style analyzer, which uses a smoothing algorithm to soften the spectral profile.
The RMS-graph (bold colored line) shows the spectral energy in a time context. If you have a short time-event, it will have less impact on the RMS-graph. If you have a continuous signal at a dedicated frequency position, it will be higher.
Analog 1/12 Octave Quick Response (full version only)
Analog-style analyzer, which consists of 12 band-pass filters per octave with low steepness, and a fast release speed. These parallel filters allow to measure transient signals very precise and quickly.
Analog 1/12 Octave Stereo + Mid/Side (full version only)
This is combination of two FFT analyzers. The first one detects the spectral information of the left and right channel (overlay), the second one shows the Mid (Mono) and the Side (Stereo)-Content of the audio-signal. This is helpful to detect low-frequency phase-issues.
Analog 1/24 Octave Max + Mid/Side Smooth (full version only)
The first slot is an analog-style analyzer, which consists of 24 band-pass filters per octave, which uses a smoothing algorithm to soften the spectral profile, its shows the maximum of the left and right channel.
The second slot uses less band-pass filters, and shows the mid and side content of the signal. It also uses visual effects. This preset is very CPU-demanding.
FFT 8192 Bands Peak Detection
A classic FFT-Analyzer with 8192 bands. The intelligent peak detection shows the position of the most resonant frequencies.
FFT 8192 Bands Smooth
This a FFT-analyzer, which uses a smoothing algorithm to soften the spectral profile.
FFT 8192 Bands Stereo + Mid/Side Peak Detection
A classic FFT-Analyzer with 8192 bands, the first one shows the stereo signal (overlay), the second one shows the mid and side content of the signal. The intelligent peak detection shows the position of the most resonant frequencies.
FFT 8192 Bands Stereo + Mid/Side Smooth
This is an FFT-analyzer, which uses a smoothing algorithm to soften the spectral profile.
FFT 16384 Bands Peak Detection
A classic FFT-Analyzer with 16384 bands. The intelligent peak detection shows the position of the most resonant frequencies.
Resizer Edge
At the bottom right of the plug-in window, you see the resizer edge, which is useful to resize the workspace of the plug-in. The size of the plugin will be saved with the plug-in instance.